14 Small Kitchen Remodel Ideas That Add Style and Storage
Small kitchen remodel ideas are targeted design, material, and organizational interventions that simultaneously improve the visual quality and functional storage capacity of a compact kitchen — creating spaces that feel larger, more considered, and more genuinely pleasurable to cook in without the cost or disruption of a full structural renovation. This article gives you exactly 14 small kitchen remodel ideas that add style and storage, spanning cabinetry upgrades, surface treatments, lighting improvements, organizational systems, and styling strategies, with specific guidance and curated product tables for every idea.
There is a particular creative challenge in the small kitchen that separates it from every other compact space in the home — it must simultaneously be a functional workspace where serious cooking happens, an organized storage system for everything from bulk dry goods to specialized equipment, and an aesthetically considered room that people genuinely enjoy inhabiting. The small kitchen that achieves all three simultaneously is not the result of spending more money but of making more intelligent decisions about where to spend what is available. These ideas range from a weekend DIY cabinet paint refresh to a strategic open shelving installation that transforms both the look and the functional capacity of the whole kitchen. Here are 14 ideas worth planning — and saving.
Why Small Kitchen Remodel Ideas Work So Well
The small kitchen has been one of the defining domestic design challenges of the urban age — as apartment living became the dominant residential form in most major cities across the twentieth century, the kitchen shrank from a large, purpose-built room with dedicated pantry and scullery to a galley or L-shaped space that must accomplish the same functions in a fraction of the footprint. The design response to this compression has produced some of the most inventive and disciplined thinking in residential interior design: the integrated kitchen, the handleless flat-front cabinetry system, the concealed appliance philosophy, and the open-plan kitchen-diner that borrows dining room space for kitchen breathing room are all design innovations driven by the specific challenge of the small kitchen.
The materials and interventions that produce the most successful small kitchen remodels share specific qualities: they prioritize visual expansion over additional storage volume (light colors, reflective surfaces, continuous vertical lines that draw the eye upward); they use the full vertical height of the kitchen rather than stopping cabinetry at standard height; they convert dead storage spaces — the backs of cabinet doors, the space above the refrigerator, the gap between the top of upper cabinets and the ceiling — into active organizational systems; and they apply design consistency throughout rather than treating each element in isolation. Color palettes for small kitchens that successfully add style tend toward light-to-mid values that reflect available natural light — warm white, soft sage green, warm greige, pale slate blue, and natural wood tones — with matte black or brushed brass hardware providing graphic definition without visual weight.
Small kitchen remodeling has become one of the highest-engagement home improvement categories on every platform from Pinterest to YouTube to specialist renovation publications, driven by the practical reality that most urban households live with a small kitchen they did not choose and cannot easily change structurally, combined with the growing design literacy that makes even renters and apartment dwellers aware that thoughtful interventions short of full renovation can produce genuinely transformative results. The most impactful small kitchen remodels documented across these platforms share a consistent characteristic: they achieve their results through three to five well-chosen, well-executed interventions rather than comprehensive surface-by-surface replacement.
Rental kitchens and leasehold apartments gain the most from the small kitchen remodel ideas in this list because many of the most impactful interventions — cabinet paint, new hardware, open shelving, organizational systems, lighting upgrades, and peel-and-stick surfaces — are either fully reversible or represent modest enough modifications to be acceptable under most tenancy agreements, allowing renters to create genuinely designed kitchen spaces within the constraints of their specific situation.
Style at a Glance
| Element | Trait 1 | Trait 2 |
|---|---|---|
| Philosophy | Visual expansion through design | Maximum function per square foot |
| Materials | Painted MDF, open oak shelving, marble contact | Brass hardware, subway tile, integrated lighting |
| Color Palette | Warm white, soft sage, pale slate | Natural oak, matte black, warm greige |
14 Small Kitchen Remodel Ideas That Add Style and Storage
1. Cabinet Door Paint Refresh with New Hardware
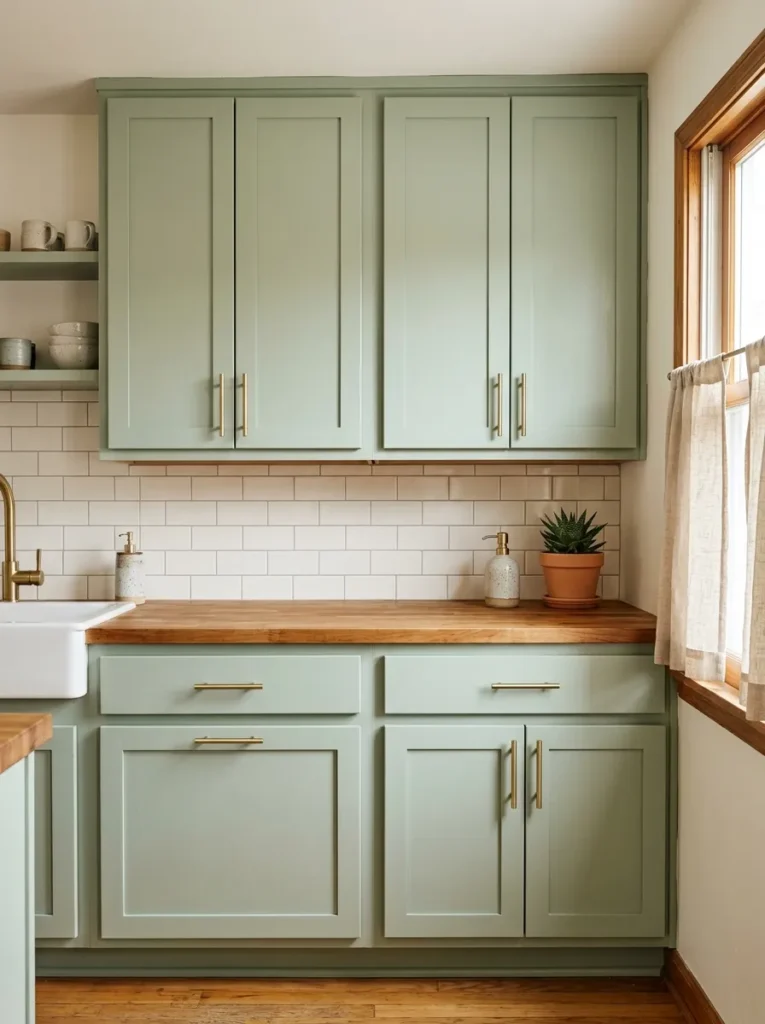
Vibe: The refreshed cabinets feel freshly considered — the most dramatic small kitchen transformation available without replacing a single cabinet carcass.
Why it works: Painting existing cabinet doors and replacing hardware is the small kitchen remodel intervention with the highest visual transformation relative to cost and disruption because it changes every surface the eye sees — the cabinet fronts constitute 60–70% of the visible wall surface in most small kitchens — while leaving the structural elements (carcasses, hinges, runners) completely untouched. The design principle is surface renewal: the cabinet carcasses and their contents remain identical, but the entire kitchen reads as new because the visible surfaces have been transformed. Chalk paint is the most appropriate cabinet paint for a small kitchen remodel because it adheres to previously painted or laminated cabinet surfaces without sanding or priming, dries to a sophisticated matte finish, and is available in the muted, design-forward colors (sage green, warm greige, dusty blue, deep forest green) that most commercial kitchen cabinetry does not offer.
How to get it: Remove all cabinet doors and drawer fronts and lay flat on a clean surface. Clean thoroughly with a degreaser — kitchen cabinet surfaces accumulate cooking oil film that prevents paint adhesion even through chalk paint’s no-prep promise. Apply two coats of chalk paint with a wide foam roller for the flattest possible finish, cutting in with a small brush at edges. Allow 2 hours between coats. Replace hardware using a jig or paper template to ensure consistent hole placement across all doors — the hardware consistency is as important as the paint quality to the finished result.
Quick Win: Replacing only the hardware — keeping existing cabinet paint — costs $30–$80 for a full kitchen and produces 40% of the visual transformation of a full cabinet repaint in 30 minutes of installation. When the budget allows only one intervention, new hardware on existing cabinets is the highest-value single purchase available.
Shop The Look
| Product |
|---|
| Chalk paint sage green kitchen cabinet finish |
| Brushed brass bar pull 128mm set of 10 |
| Cabinet paint foam roller set small kitchen |
| Hardware installation jig template spacing |
| Kitchen degreaser spray cabinet prep clean |
Also view: 14 Creative Home Decor Ideas to Refresh Your Space
2. Open Shelving Installation Above Counter (LAYOUT / MATERIAL)
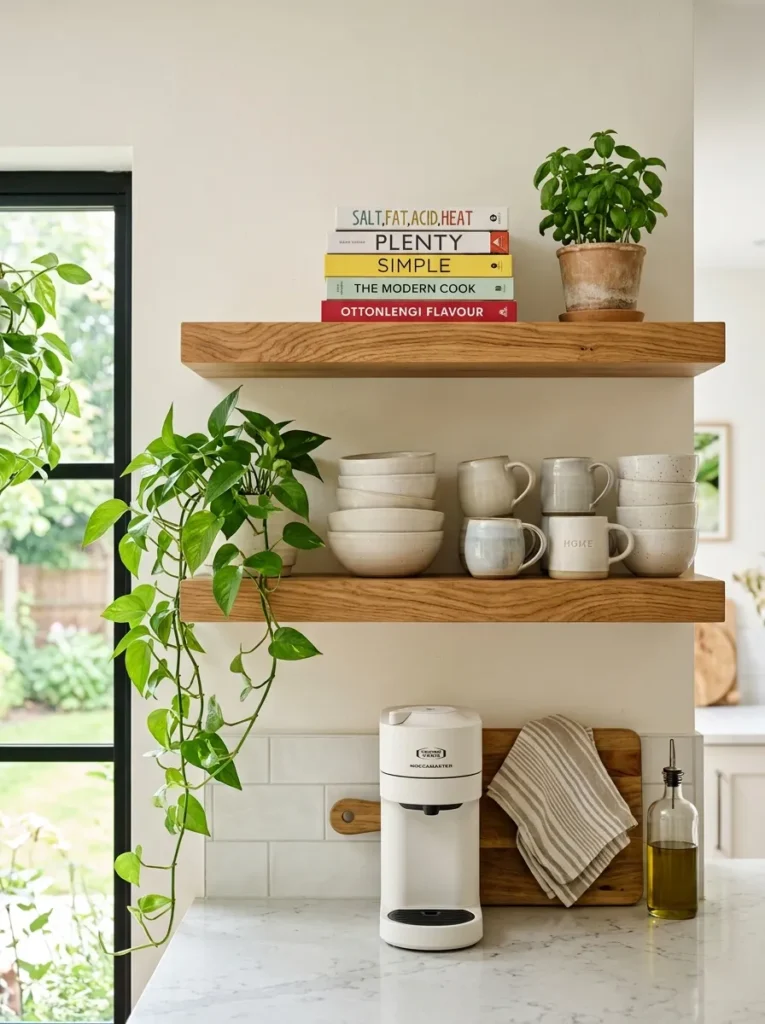
Vibe: The open shelving feels airy and considered — the removal of upper cabinet boxes replacing visual weight with openness and the warmth of natural oak.
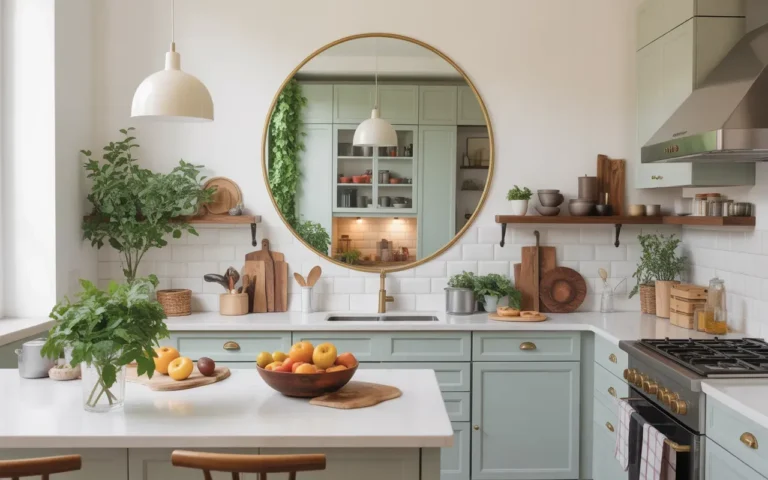
Why it works: Replacing one run of upper cabinets with open floating shelves in a small kitchen is the remodel intervention that most dramatically expands the perceived size of the space because it removes the visual mass of the upper cabinet boxes — which create a heavy horizontal band across the kitchen’s upper wall — and replaces it with open air interrupted only by the slim profile of the shelf boards. The design principle is visual decompression: the space freed above the counter reads as borrowed breathing room that makes the kitchen feel measurably larger. The practical storage capacity of open shelving is lower than closed cabinets, but this constraint enforces the curation discipline — keeping only genuinely beautiful or frequently used objects on visible display — that produces kitchens that look considered rather than stuffed.
How to get it: Remove the chosen upper cabinet run completely, patching and repainting the wall behind to a consistent finish. Install floating shelf brackets rated for kitchen use (minimum 20kg load per bracket) into wall studs — solid timber shelves of 25mm thickness at 200–250mm depth require brackets every 400–500mm along the shelf length. Choose shelf timber in solid oak, ash, or pine — apply two coats of hard-wax oil rather than varnish for a warm, food-safe surface that is easily refreshed. Space the two shelves approximately 30cm apart for standard plate and bowl storage on the lower shelf and book-height clearance on the upper.
Shop The Look
| Product |
|---|
| Solid oak shelf board 25mm thick natural |
| Floating shelf bracket heavy duty wall mount |
| Hard wax oil clear natural wood kitchen |
| White ceramic bowl set stackable kitchen |
| Trailing pothos small pot shelf display |
Also view: 13 Cute Room Ideas for a Fun Stylish Vibe
3. Subway Tile Backsplash in Unexpected Color (COLOR / MATERIAL)
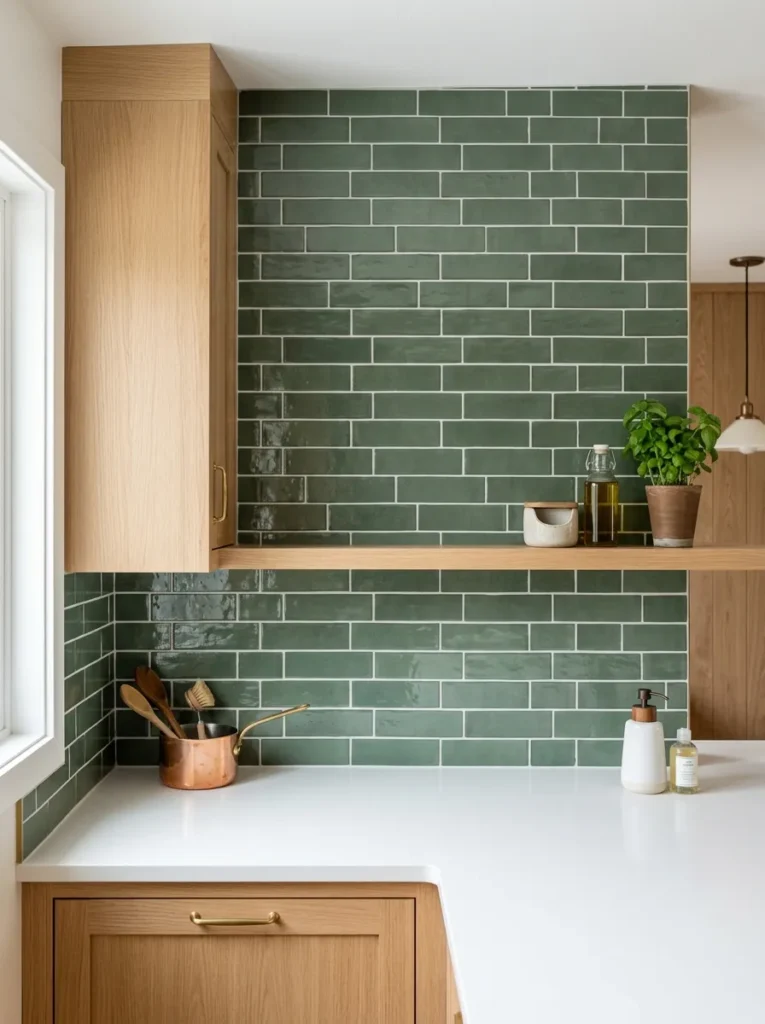
Vibe: The sage green backsplash feels boldly considered — a single color decision that gives the entire kitchen a design identity it previously lacked.
Why it works: A subway tile backsplash in an unexpected color — sage green, dusty blue, warm terracotta, deep forest green — is the small kitchen remodel intervention that adds the most design identity per square foot because the backsplash is the kitchen’s largest continuous decorative surface and the most directly visible when standing at the hob or sink. The subway tile format (75x150mm or 100x200mm rectangular tiles in a brick bond pattern) is the most appropriate choice for a small kitchen because its familiar, historically grounded format provides the visual simplicity that small spaces require — the color provides all the interest, the tile shape provides the reliable calm. Running the backsplash tile floor-to-ceiling rather than only between the counter and upper cabinets is the single specification decision that most elevates the result from a standard backsplash to a genuinely architectural kitchen feature.
How to get it: Prepare the backsplash wall with a suitable primer if tiling directly over painted plasterboard. Use a notched trowel and standard white tile adhesive applied to the wall surface (back-buttering is not necessary for standard-weight ceramic subway tile). Work in horizontal rows from the bottom upward, using tile spacers of 2mm for a traditional narrow grout joint. Allow adhesive to cure for 24 hours before grouting with white or off-white unsanded grout. Seal the grout lines with a silicone grout sealer immediately after curing and annually thereafter to prevent staining in the kitchen environment.
Shop The Look
| Product |
|---|
| Sage green subway tile 75x150mm ceramic |
| White unsanded grout fine joint tile |
| Tile adhesive standard white kitchen backsplash |
| Grout sealer silicone spray kitchen tile |
| Tile spacer set 2mm plastic kitchen tile |
4. Under-Cabinet LED Lighting (LIGHTING)
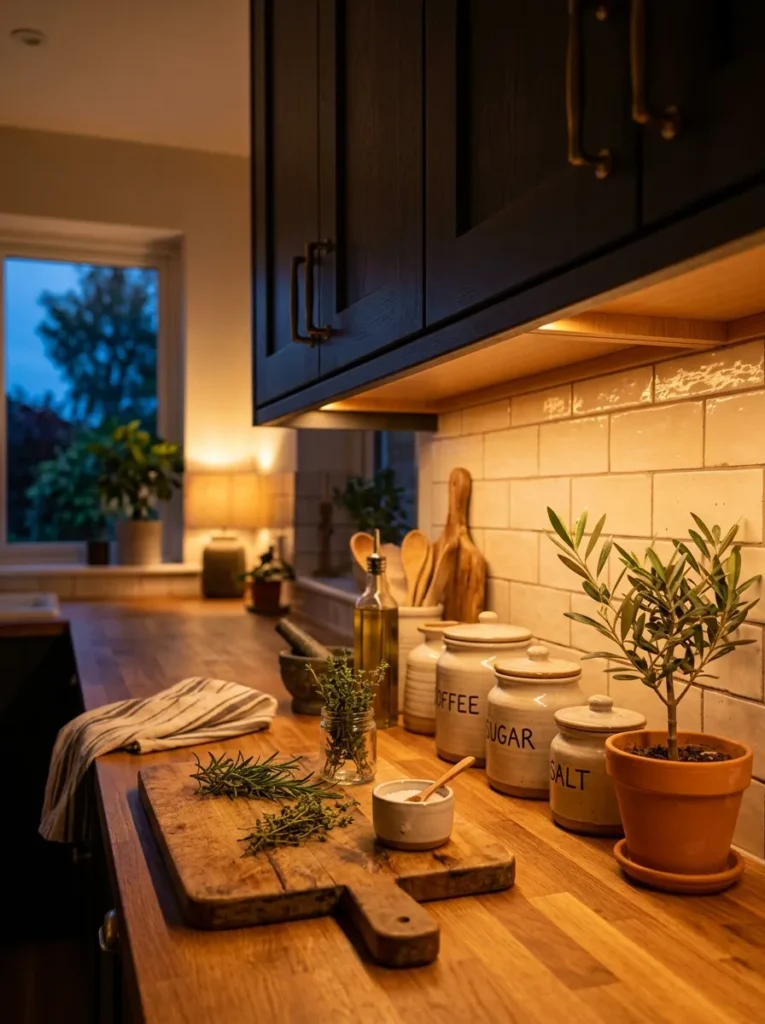
Vibe: The under-cabinet lighting feels warmly transformative — the single lighting addition that makes a small kitchen feel like a professional, considered cooking environment.
Why it works: Under-cabinet LED lighting is the small kitchen upgrade with the most immediate and most sustained practical and atmospheric impact because it addresses the small kitchen’s most consistent functional failure: inadequate task lighting on the counter surface where all food preparation happens. Overhead kitchen lighting, positioned in the room’s ceiling center, casts shadows from the upper cabinets onto the very counter surface where light is most needed — a design failure that under-cabinet lighting eliminates entirely by placing the light source directly above the work surface. The visual impact is equally significant: warm LED light reflecting off the backsplash tile and counter surface creates the layered, atmospheric lighting quality that distinguishes a genuinely well-designed kitchen from a merely adequately lit one.
How to get it: Install LED strip lighting rated at minimum 400 lumens per meter at 2700K color temperature for the warmest, most flattering kitchen light. Mount the strip flush to the front underside edge of the upper cabinets using the integrated adhesive backing, ensuring the strip is positioned as close to the cabinet’s front edge as possible to maximize counter coverage and minimize the LED shadow at the counter’s back edge. Route the wiring through the cabinet interior if possible, exiting through a small hole drilled in the cabinet base. Connect all strips in a run to a single dimmer switch — the ability to dim the under-cabinet lights creates the range from full task brightness to intimate ambient that makes the kitchen genuinely multi-functional.
Shop The Look
| Product |
|---|
| LED strip light 2700K warm white kitchen 5m |
| Under cabinet LED dimmer switch connector |
| LED strip mounting clips adhesive cabinet |
| Cabinet wire management clips tidy interior |
| Smart LED strip controller dimmer app |
5. Peel-and-Stick Marble Contact Paper Countertop (MATERIAL / COLOR)
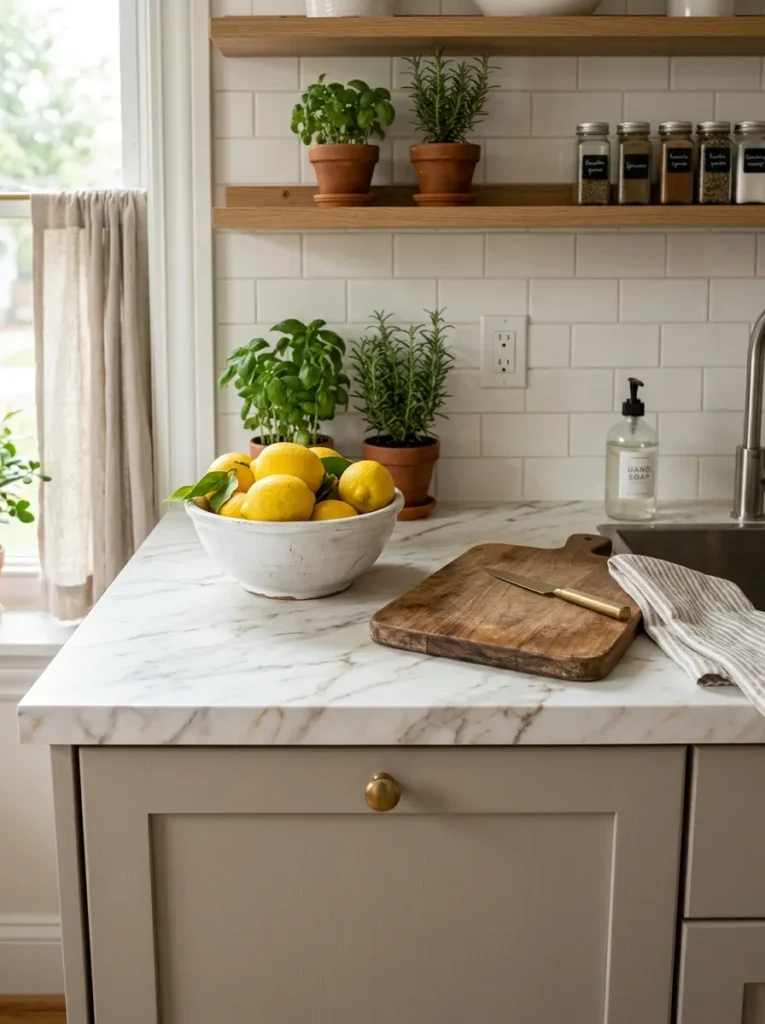
Vibe: The marble contact paper feels surprisingly convincing — the counter transformation that makes every visitor ask what the countertop material is.
Why it works: High-quality peel-and-stick marble effect contact paper is the small kitchen remodel intervention with the highest perceived-value-to-cost ratio because it replaces the visual impact of an expensive stone counter — the single most aspirational surface in contemporary kitchen design — for $30–$60 in materials and one afternoon of installation. The design principle is surface simulation: the most design-literate contact paper products (from brands like Chic Wallpaper, Magic Fix, and Wallpaper Mart) achieve their realistic quality through photographic reproduction of actual stone with authentic scale veining patterns that read as convincing at normal room viewing distances. The limitations are practical rather than visual — contact paper counter surfaces require more careful maintenance than genuine stone, cannot be used as hot pan resting surfaces, and have a useful life of 2–4 years before replacement.
How to get it: Clean the existing counter surface completely — any grease, wax, or residue prevents proper adhesion. Measure and cut the contact paper to the counter’s dimensions, allowing 5cm overhang on all edges for trimming. Apply from one end, peeling the backing paper 10–15cm at a time and smoothing each section firmly with a squeegee or credit card before advancing to prevent air bubbles. Trim the overhang at the counter edge with a craft knife and metal ruler, pressing the cut edge firmly for maximum adhesion. Apply the contact paper slightly onto the counter’s front face (wrapping 2–3cm) to create a seamless finished edge rather than an obvious cut line at the counter front.
Shop The Look
| Product |
|---|
| Marble effect contact paper self adhesive 60cm |
| Squeegee smoothing tool bubble free application |
| Craft knife set precision blades trimming |
| Metal ruler 60cm stainless cutting guide |
| Contact paper sealer edge adhesive clear |
6. Floor-to-Ceiling Pantry Cabinet (LAYOUT / SMALL SPACE)
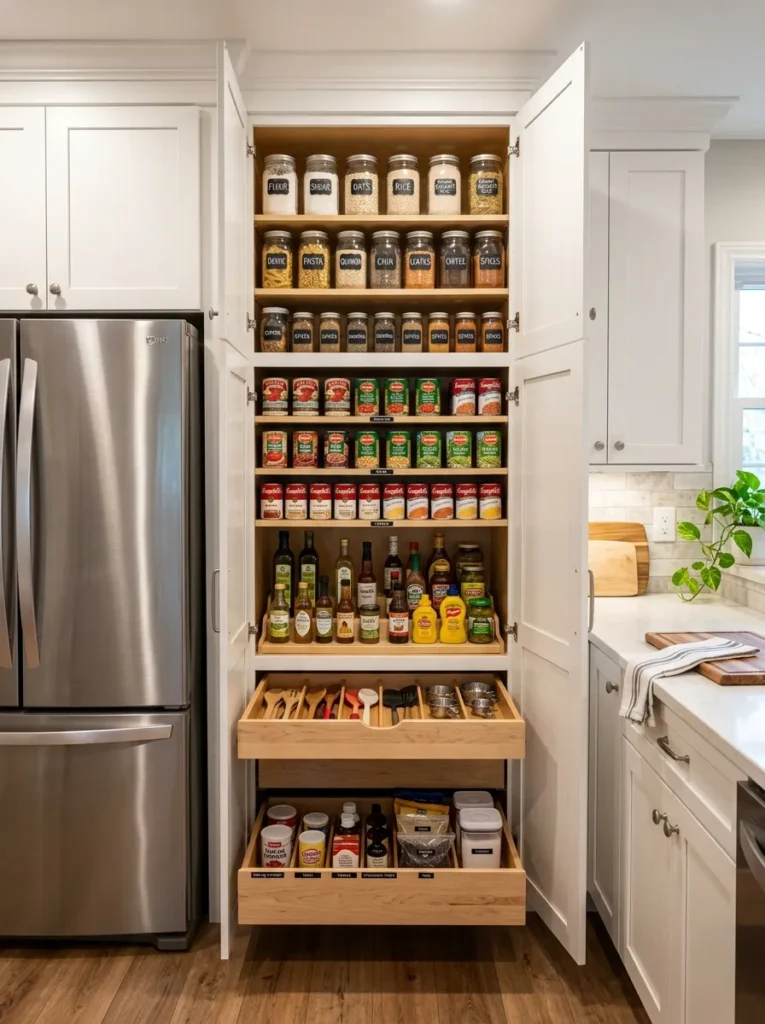
Vibe: The floor-to-ceiling pantry feels abundantly organized — a single cabinet that solves the small kitchen’s storage deficit more completely than any other single intervention.
Why it works: A floor-to-ceiling pantry cabinet installed in a small kitchen is the remodel intervention with the greatest storage capacity addition per square foot of floor space consumed because it uses the kitchen’s full ceiling height — typically an underutilized zone above the standard 90cm counter height — to create storage volume that no standard-height cabinet bank can approach. A single 60x220cm pantry cabinet provides approximately 1.3 square meters of usable shelf area, equivalent to five standard-height kitchen cabinets, while occupying only 60cm of wall length. The design principle is vertical maximization: in a small kitchen where floor area is finite, the only available expansion direction is upward, and a full-height pantry exploits this vertical potential completely.
How to get it: Source a floor-to-ceiling larder cabinet from IKEA’s SEKTION or PAX range, from specialist kitchen suppliers, or have one built from MDF by a local carpenter. The interior should be divided into three functional zones: upper shelves (accessible by step stool) for less-frequently used bulk storage and preserves; mid-level shelves (between eye height and waist height) for daily-access pantry items; and lower drawers (below counter height) for utensils, baking equipment, and items that benefit from pull-out rather than reach-in access. The exterior should match the surrounding cabinetry in door style, color, and hardware for visual continuity.
Shop The Look
| Product |
|---|
| Glass storage jar set 12 piece pantry labeling |
| Drawer divider set adjustable pantry organizer |
| Cabinet door organizer rack spice storage |
| Pantry label set clear adhesive chalkboard |
| Pull out drawer organizer cabinet insert |
7. Magnetic Knife Strip and Wall Tool Rail (ACCESSORIES / LAYOUT)
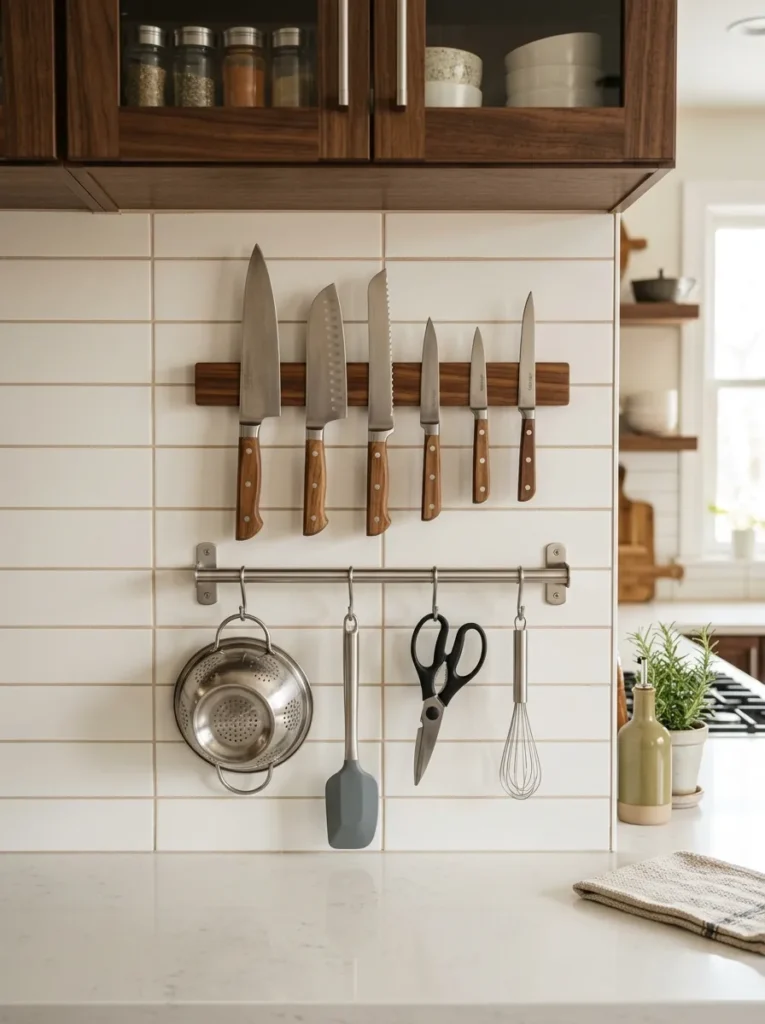
Vibe: The wall tool system feels professionally organized — the counter-clearing intervention that makes a small kitchen feel like a serious cooking space.
Why it works: A magnetic knife strip combined with a stainless steel rail and S-hook system is the small kitchen intervention that frees the most counter space per wall area used because it moves the kitchen’s most space-consuming counter items — knife block (typically 15x30cm), utensil holder (typically 10cm diameter), and frequently used tool collection — onto the vertical backsplash surface where they consume zero counter space while remaining fully visible and accessible. The design principle is surface liberation: every item moved from the counter to a wall-mounted position approximately doubles the available work surface in a small kitchen by removing the constant encroachment of stored items onto the preparation area. The wall-mounted tool display also communicates kitchen competence — a wall of organized, accessible tools reads as a professional cooking space regardless of the kitchen’s actual size.
How to get it: Mount the magnetic knife strip first — at the position between the upper cabinet underside and the backsplash, high enough to be safely above hand reach during counter work. Specify a wooden magnetic strip (natural wood or walnut finish) for visual warmth rather than the stainless steel version that reads as institutional in a domestic kitchen. Mount the stainless rail 15cm below the knife strip, using the wall anchors provided and ensuring both fixings hit wall studs for adequate load capacity. Install S-hooks for the four to six most frequently used tools — those reached for in every cooking session, not the full utensil collection.
Shop The Look
| Product |
|---|
| Magnetic knife strip natural wood 40cm wall |
| Stainless steel kitchen rail wall mount 60cm |
| S-hook set kitchen rail stainless steel |
| Kitchen knife set chef’s complete 5 piece |
| Silicone kitchen utensil set heat resistant |
8. Inside Cabinet Door Organization (SMALL SPACE / ACCESSORIES)
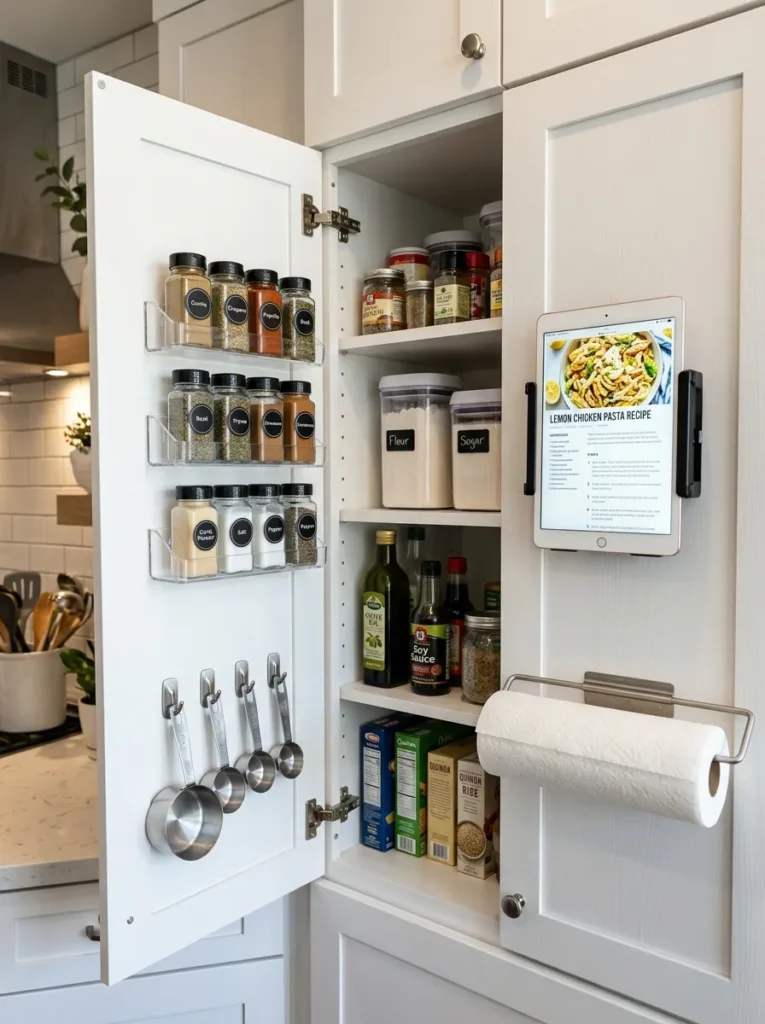
Vibe: The inside-door organization feels ingeniously resourceful — discovered storage space that was always there but never used.
Why it works: The inside surfaces of kitchen cabinet doors represent the most consistently underutilized storage space in any small kitchen — each door provides a flat, accessible surface area of approximately 400x500cm that can be fitted with organizational accessories without consuming any shelf space, counter space, or drawer space. The design principle is surface activation: converting every available vertical surface — including the typically blank interior faces of cabinet doors — into active organizational space is the defining discipline of small kitchen storage maximization. The inside-door spice rack is the highest-impact single application: mounting a door-hung spice rack inside the cabinet most proximate to the cooking area moves the spice collection from a counter cluster or hard-to-access shelf position to an instantly visible, fully labeled, immediately accessible location that significantly improves the cooking experience.
How to get it: Measure the inside face of each cabinet door carefully before purchasing any inside-door organizer — the fitting must clear the shelf edge when the door closes, which requires precise depth measurement. For most standard kitchen cabinets with 12mm MDF doors and 470mm deep shelves, the maximum fitting depth is 35–40mm from the door interior surface. Attach organizational accessories using the mounting hardware provided — typically screws into the door’s MDF core. Do not use adhesive-only mounting for heavy items (spice racks with full jars) — the weight and vibration of repeated opening and closing will eventually overcome adhesive-only fixtures.
Shop The Look
| Product |
|---|
| Cabinet door spice rack clear acrylic 12 jar |
| Inside cabinet door organizer clear mount |
| Adhesive hook set inside cabinet small |
| Tablet holder mount inside cabinet recipe |
| Measuring cup set magnetic hook kitchen |
9. Statement Kitchen Island on Wheels (LAYOUT / FURNITURE)
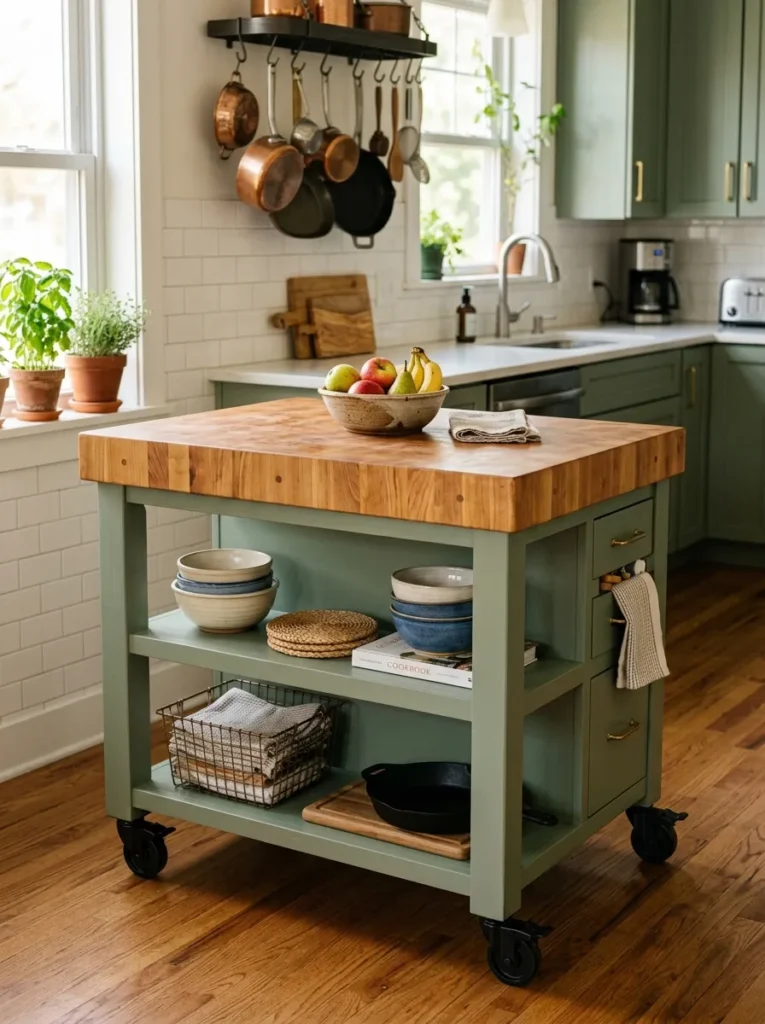
Vibe: The rolling island feels practically generous — extra counter space that appears when needed and moves aside when it does not.
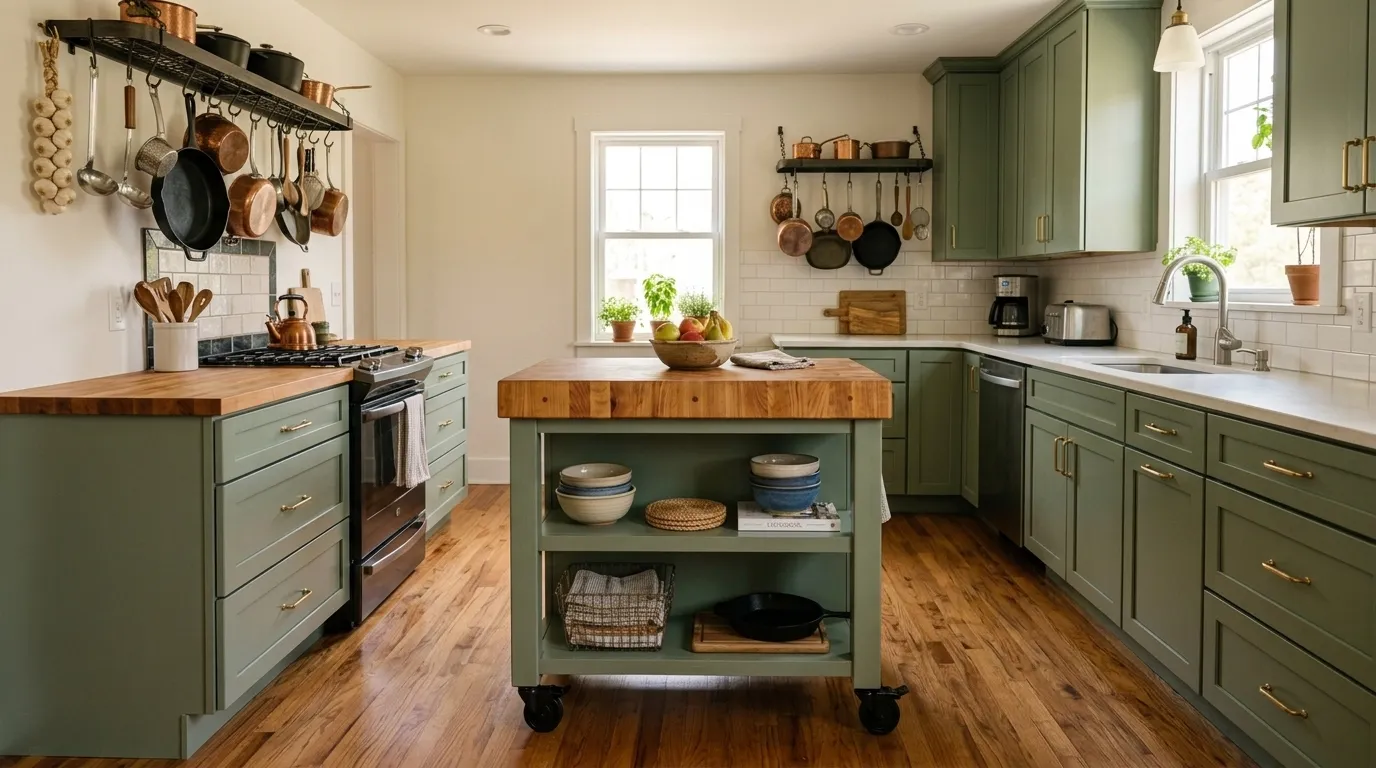
Why it works: A small kitchen island on locking casters is the furniture intervention that most improves a small kitchen’s functional versatility because it adds counter space, storage, and a secondary work surface without any permanent installation, allowing the kitchen’s layout to be reconfigured for different tasks — the island positioned centrally for food preparation, moved aside for large gatherings, or rolled to a specific wall position for serving. The design principle is flexible function: in a kitchen where every square foot is fixed and permanent, the addition of one movable, multi-function piece creates the adaptive quality that small kitchens most lack. The butcher block top is the most appropriate surface material — warm, naturally beautiful, food-safe, and self-repairing through periodic oiling — and the open shelves below provide the always-accessible storage that solid-sided base units cannot.
How to get it: Source a butcher block kitchen island from IKEA (BEKVAM, GROLAND) or specialist kitchen suppliers, or build from a butcher block panel and a base frame with caster-mounted legs from a timber merchant. Specify locking rather than non-locking casters — non-locking casters on a kitchen island create a genuine safety hazard when the island is used for food preparation tasks requiring downward pressure. Size the island to leave a minimum 90cm passageway on all sides when positioned for cooking — clearance below this width prevents comfortable kitchen circulation around the island.
Shop The Look
| Product |
|---|
| Butcher block kitchen island small wheels |
| Locking caster set 50mm heavy duty 4 piece |
| Butcher block oil conditioner food safe natural |
| Open shelf basket set island lower storage |
| Bar stool set 2 piece island counter height |
10. Ceiling-Height Upper Cabinets (LAYOUT / SMALL SPACE)
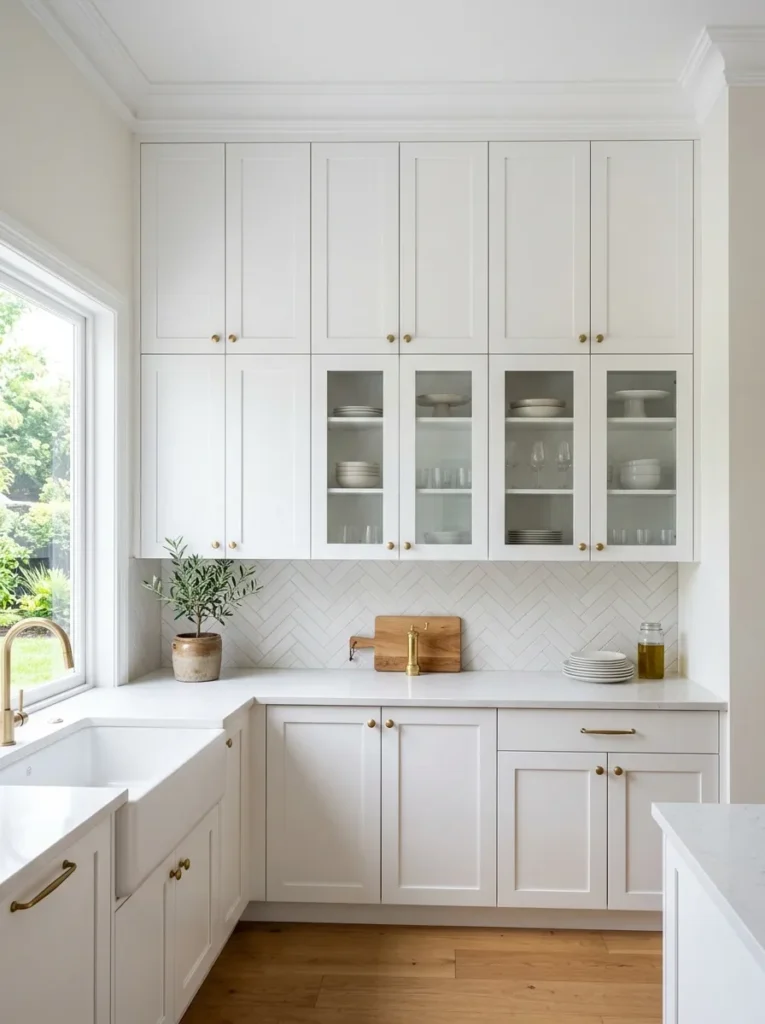
Vibe: The ceiling-height cabinets feel architecturally complete — a kitchen that reads as purpose-built rather than kit-assembled, the full-height run eliminating every awkward gap and unused surface.
Why it works: Extending upper kitchen cabinets to full ceiling height is the small kitchen remodel that adds the most storage volume while simultaneously improving the kitchen’s visual quality — because the gap between standard upper cabinet tops and the ceiling is simultaneously a storage vacuum (too awkward to reach and use effectively), a dust and grease accumulation zone, and a visual distraction that fragments the kitchen’s vertical surface. Eliminating the gap by extending cabinets to ceiling height produces three simultaneous improvements: significant additional storage in the upper section, a clean architectural line that makes the room feel taller, and the removal of the most consistently problematic cleaning surface in any kitchen. The design principle is vertical closure: a kitchen whose cabinets run continuously from counter to ceiling reads as architecturally complete in a way that standard-height cabinets with gap above can never achieve.
How to get it: The ceiling-height extension can be approached in two ways: replacing all upper cabinets with full-height units (most expensive, most seamless), or adding a second tier of cabinets above the existing standard upper cabinets in matching door style and color (less expensive, requires careful visual matching). For the second-tier approach, the new upper cabinets should be identical in door profile and hardware to the existing lower upper cabinets — the critical success factor is the paint or finish match, which requires testing on the actual existing doors in the actual kitchen light before committing.
Shop The Look
| Product |
|---|
| Kitchen cabinet filler strip ceiling gap close |
| Cabinet touch up paint matching kit kitchen |
| Step stool folding kitchen access upper |
| Cabinet organizer pull down high shelf reach |
| Under shelf basket wire kitchen upper cabinet |
11. Herringbone Vinyl Floor Update (MATERIAL / COLOR)
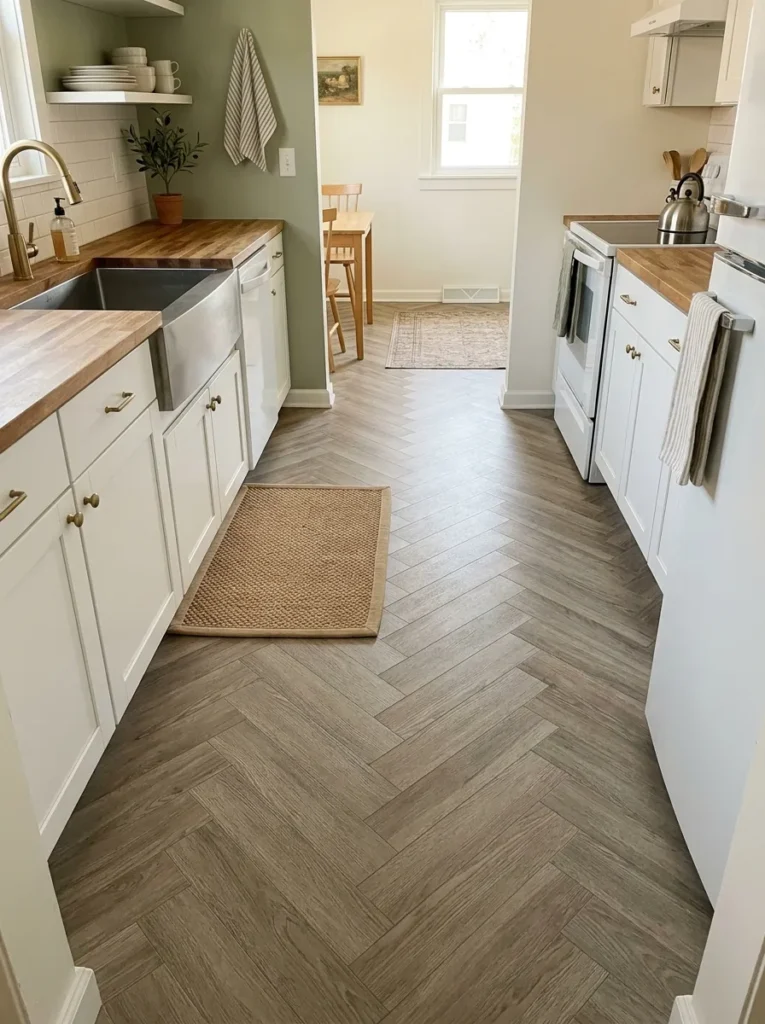
Vibe: The herringbone vinyl floor feels warmly expansive — a diagonal pattern that visually enlarges the floor area while adding the most design-forward floor treatment available at this price point.
Why it works: A herringbone pattern vinyl floor installation is the small kitchen remodel that most dramatically expands the perceived floor area because the herringbone pattern’s diagonal geometry draws the eye along the diagonal axis — the longest dimension available in any rectangular room — rather than along the shorter horizontal and vertical axes that straight-set tiles emphasize. The design principle is diagonal perception: the eye traveling along a diagonal line perceives more floor length than it does traveling along a horizontal or vertical line of equal actual measurement, which makes herringbone-patterned floors in small rooms read as measurably larger than they are. Peel-and-stick vinyl in a wood-look finish achieves this effect at a fraction of the cost of genuine hardwood herringbone, and is fully compatible with kitchen moisture and cleaning requirements.
How to get it: Clean and level the existing floor completely before installation — any debris or height variation will telegraph through the thin vinyl tiles and create an uneven finished surface. Find the room’s center point and snap chalk lines in the herringbone’s diagonal axis (45 degrees to the room walls) before laying any tiles. Begin laying tiles from the center outward, maintaining the herringbone pattern’s consistent joint relationship throughout. Cut border tiles using a craft knife and metal ruler — vinyl tiles cut cleanly without specialist tools. Press each tile firmly with a roller or rolling pin immediately after placement to activate the adhesive fully.
Shop The Look
| Product |
|---|
| Peel stick vinyl tile herringbone greige wood |
| Floor roller 9 inch vinyl tile adhesion |
| Chalk line reel floor tile layout marking |
| Vinyl tile cutter craft knife metal ruler |
| Grout pen natural white floor tile joints |
12. Recessed Niche Shelf in Backsplash (SMALL SPACE / LAYOUT)
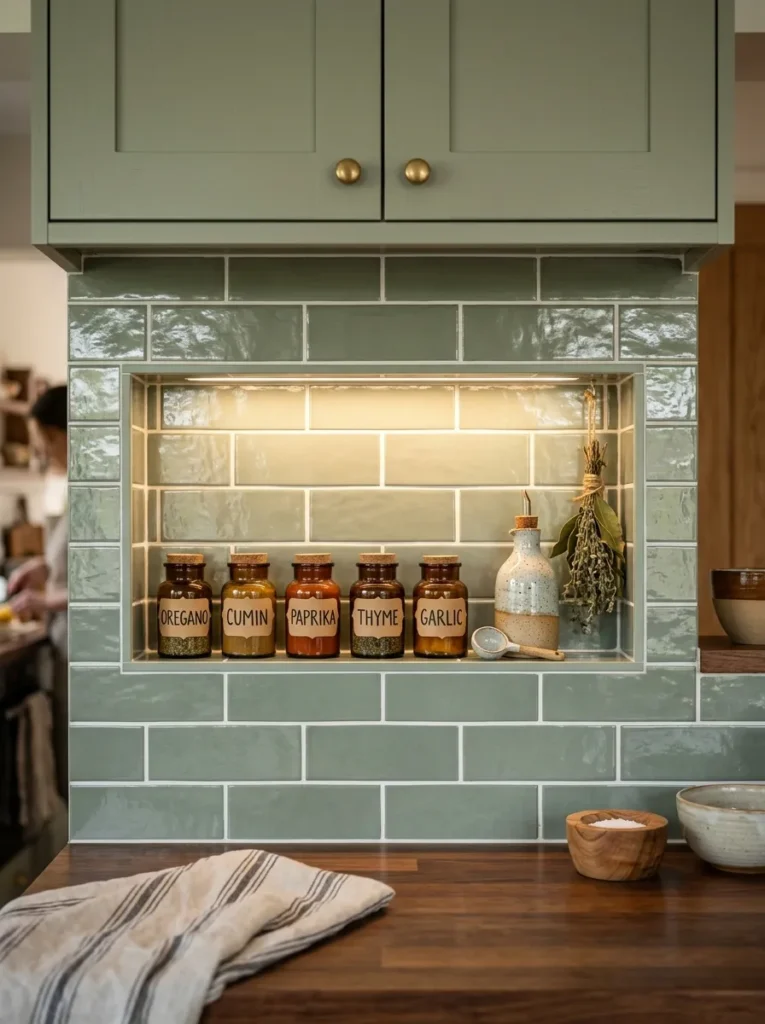
Vibe: The recessed niche feels architecturally ingenious — storage that appears from within the wall rather than projecting from it, the ultimate space-neutral kitchen addition.
Why it works: A recessed backsplash niche shelf creates storage volume without consuming any floor or counter space and without projecting into the kitchen space — it appears to exist within the wall rather than being added to it, which is the fundamental storage achievement in a small kitchen where every projection into the space is costly. The design principle is wall-embedded storage: by cutting into the wall cavity between studs (in timber-framed walls) or cutting into a non-structural masonry wall, the designer creates a storage volume that has zero impact on the kitchen’s dimensional feel. Finished with the same tile as the surrounding backsplash and lit from above with a small LED strip, the niche reads as a designed architectural feature rather than a storage improvisation.
How to get it: Verify the wall’s internal structure before cutting — timber-framed walls between studs provide approximately 90mm of usable depth; solid masonry walls allow deeper cutting but require more labour. Mark the niche opening carefully and cut with an oscillating multi-tool. Frame the opening with timber to provide a flat surface for tile adhesion. Tile the niche interior — including sides, back, and the niche floor — with the same tile used on the surrounding backsplash for visual continuity. Install a small LED strip at the niche’s interior top edge, connecting to the under-cabinet LED circuit if one exists.
Shop The Look
| Product |
|---|
| Niche shelf kit tile ready bathroom kitchen |
| Consistent spice jar set glass label kitchen |
| Small LED strip niche interior warm white |
| Ceramic oil bottle kitchen counter natural |
| Dried herb bundle kitchen decor natural |
13. Pendant Lighting Upgrade Over Sink or Island (LIGHTING)
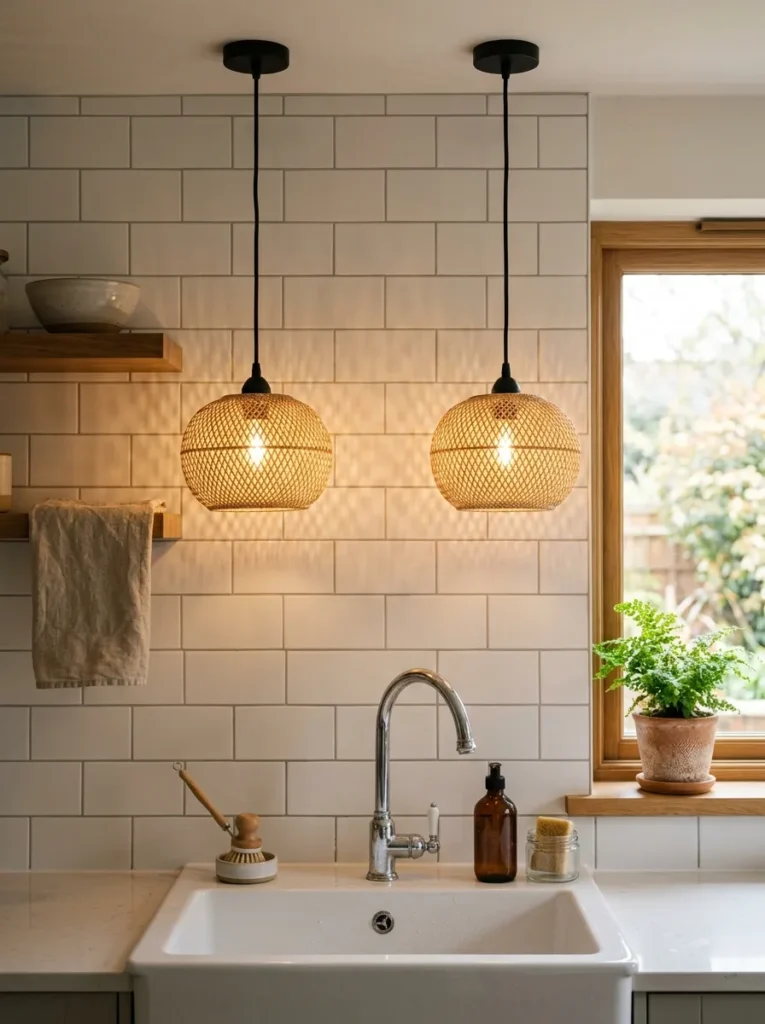
Vibe: The pendant lights feel warmly considered — the single lighting addition that transforms the kitchen sink from a utilitarian fixture into the room’s most atmospherically beautiful spot.
Why it works: Adding pendant lights above the kitchen sink or island is the small kitchen lighting upgrade that produces the most dramatic change in the room’s atmosphere because it introduces the only decorative light source in a space typically dominated by cold, undifferentiated overhead lighting. The design principle is focal lighting: pendant lights positioned over the sink or island create a pool of warm, focused light that gives the kitchen a visual center of gravity — a place where the eye settles naturally and where the quality of the light makes the functional task (washing up, food preparation) feel more pleasurable. Rattan pendants are the most appropriate choice for a small kitchen because their woven shade diffuses the bulb’s point source into a warm, even glow while casting the lace-like shadow pattern on the surrounding tile that makes the kitchen feel genuinely designed.
How to get it: Install pendant lights over an existing ceiling junction box or add a new junction box at the pendant position — the latter requires an electrician in most jurisdictions. Position a single pendant centered above a kitchen island, or two pendants flanking the center of a kitchen sink window at 600mm above the counter surface and 350mm apart. Specify a warm 2700K LED bulb for each pendant — the color temperature is as important as the shade design for the finished lighting atmosphere. In a small kitchen, pendant lights should be small (15–25cm diameter) — large pendants in a small kitchen create visual heaviness rather than the considered accent effect that smaller pendants achieve.
Shop The Look
| Product |
|---|
| Rattan pendant light small 20cm black cord |
| Pendant light ceiling rose black fitting |
| Warm white LED bulb E27 2700K dimmable |
| Pendant cord adjuster height setting black |
| Kitchen sink light pendant pair installation |
14. Cohesive Container and Jar System (ACCESSORIES / COLOR)
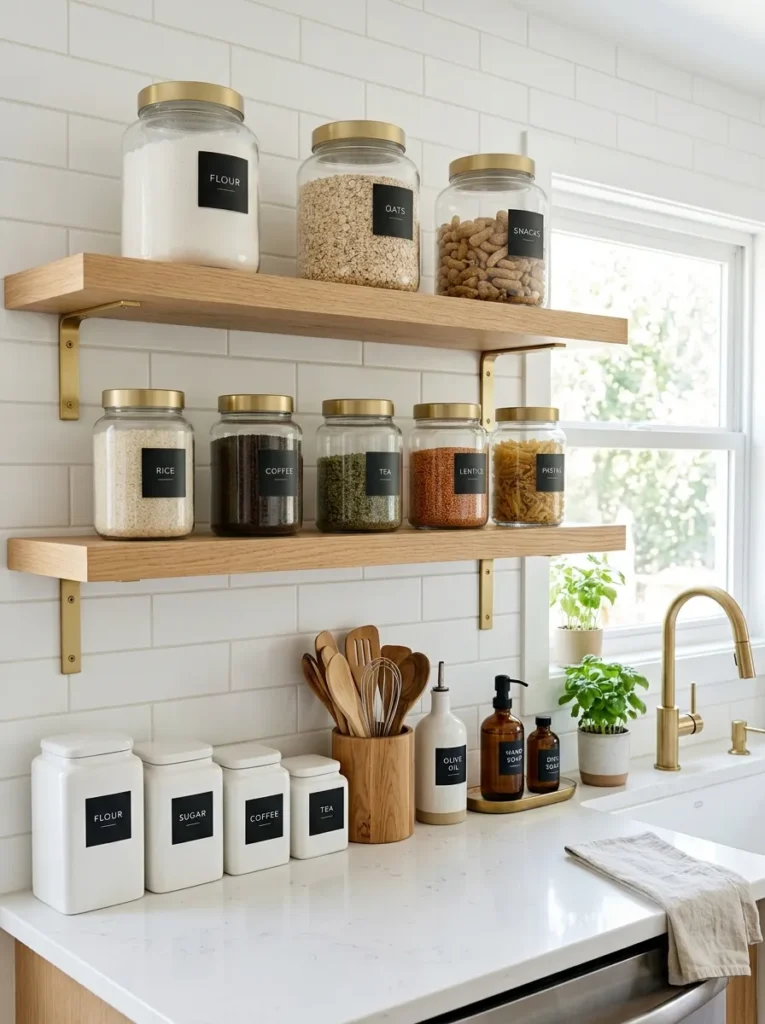
Vibe: The cohesive container system feels organized and intentional — the transformation of a visually chaotic counter into something that reads as designed through consistency of material and finish alone.
Why it works: A cohesive kitchen container and jar system is the small kitchen styling intervention with the most immediate visual impact per dollar spent because it replaces the visual noise of mismatched packaging — the varied colors, graphics, and sizes of commercial food packaging that typically dominate kitchen counters and open shelves — with a unified visual system where consistent materials and finishes create the calm, organized quality of a genuinely designed kitchen regardless of the kitchen’s size or the quality of its permanent fixtures. The design principle is material consistency: when every visible storage container shares the same glass, lid finish, and label aesthetic, the kitchen reads as organized at a system level rather than merely tidy at a surface level — a quality of visual order that no amount of individual tidying can achieve with mismatched containers.
How to get it: Audit the counter and open shelf contents — identify every item currently visible and determine whether it is used daily (remains on counter), weekly (goes on accessible shelf), or less frequently (stored inside a cabinet). Purchase a consistent jar family in three sizes (small for spices and coffee, medium for pasta and rice, large for flour and sugar) with identical lid finishes — clear glass with gold lids and consistent label style is the most universally home-compatible combination. Decant all counter and shelf-visible dry goods into the new jars and label consistently using either a chalkboard label set or a label maker in consistent typography.
Quick Win: Transferring just three counter-visible food items — coffee, tea, and sugar — from their original packaging into matching clear glass jars with consistent labels takes 15 minutes and costs $15–$20 but reduces the visual noise on a kitchen counter by 40%, producing an immediate and disproportionate improvement in the kitchen’s overall aesthetic.
Shop The Look
| Product |
|---|
| Clear glass kitchen jar set gold lid 3 sizes |
| Chalkboard label set adhesive kitchen jars |
| White ceramic canister set 4 piece kitchen |
| Wooden utensil holder natural kitchen counter |
| Matching soap dispenser ceramic pump kitchen |
How to Start Your Small Kitchen Remodel
Your single best first move is to spend one week noting every moment during cooking and kitchen use when you experience friction — the drawer you open three times looking for the right tool, the counter space that is never adequate, the cabinet shelf you cannot see into, the light that makes evening cooking feel unpleasant. These friction points are the design brief for your small kitchen remodel: they identify the specific functional failures that most affect daily quality of life, and addressing them first produces the most sustained improvement in how the kitchen actually feels to use. A kitchen remodel that resolves the top five friction points will be more successful than one that improves every surface without specifically addressing any functional failure.
The most common mistake in small kitchen remodeling is spending the available budget on one comprehensive surface change — replacing all counter surfaces, or all floor tiles, or all appliances — rather than distributing the same budget across three or four targeted interventions that address the kitchen’s most significant visual and functional problems simultaneously. A new countertop in an otherwise unchanged kitchen makes the existing cabinets look more dated by comparison; new cabinets with the original floor and lighting make the floor and lighting look worse. Fix this by planning the remodel as a system — identifying the three to five elements that are most visually and functionally important and budgeting to address all of them at a sufficient quality level, rather than addressing one element comprehensively.
Three specific items under $50 that create the most immediate and lasting small kitchen improvement: a magnetic wooden knife strip ($18–$28) that clears 15–20cm of counter space and simultaneously improves knife accessibility and safety; a consistent set of six clear glass jars with matching gold lids and chalk labels ($20–$30) that transforms the visual quality of counter and open shelf storage; and a 5-meter roll of warm white LED strip lighting ($15–$25) that, installed under the upper cabinets, permanently improves task lighting quality and kitchen atmosphere during the evening hours when most household cooking happens.
A basic small kitchen refresh — cabinet hardware replacement, under-cabinet LED installation, and a cohesive container system — takes one weekend and costs $80–$150. A mid-level remodel adding open shelving, a backsplash tile upgrade, and a pendant light installation takes 2–3 weekends and costs $300–$600. A comprehensive small kitchen transformation including cabinet repainting, full-height pantry installation, ceiling-height cabinet extension, new floor, and complete lighting redesign takes 4–6 weeks and costs $1,500–$4,000 — still significantly less than the $15,000–$40,000 cost of a full kitchen replacement, while producing a result that addresses every visual and functional issue the original kitchen presents.
Frequently Asked Questions About Small Kitchen Remodel Ideas
What is the most impactful small kitchen remodel idea on a limited budget?
Cabinet door painting combined with hardware replacement is consistently the highest-impact single intervention for a limited budget because it changes the visual character of 60–70% of the kitchen’s visible surface area for a total material cost of $80–$150 for an average small kitchen. The result is indistinguishable in daily experience from a full kitchen replacement cabinet installation when the existing carcasses are in good structural condition — which they almost always are, as kitchen carcasses are built to outlast many cycles of door and hardware replacement. Under-cabinet LED lighting is the second highest-impact limited budget intervention, delivering both functional and atmospheric improvement for $25–$50 in materials.
How do I make a small kitchen feel bigger without structural changes?
Five specific design interventions reliably expand the perceived size of a small kitchen without structural change: painting the walls and cabinets in the same light color (eliminating the visual fragmentation that contrasting surfaces create); installing floor-to-ceiling upper cabinets (eliminating the gap above standard cabinets that fragments the wall surface); using a herringbone or diagonal floor pattern (the diagonal geometry draws the eye along the room’s longest axis); replacing closed upper cabinets with open shelving on one wall (removing the visual mass of the upper cabinet boxes); and installing under-cabinet lighting (eliminating the shadow cast by upper cabinets over the counter, which makes the counter zone feel smaller and darker than it actually is). Applied simultaneously, these five interventions can make a kitchen feel 30–40% larger than its actual dimensions.
Can I remodel a rental kitchen without losing my deposit?
Several of the most impactful small kitchen remodel ideas in this list are fully reversible and appropriate for rental kitchens: peel-and-stick contact paper on counters and as a backsplash treatment; peel-and-stick vinyl floor tiles over the existing floor; removable adhesive cabinet door wraps that change the visual character of existing doors without paint; magnetic knife strips mounted with command strips rather than screws; and cohesive container and organizational systems that improve the kitchen’s function and visual quality without touching the permanent surfaces. Cabinet hardware replacement (swapping handle screws with the originals retained for reinstatement) is generally acceptable under most tenancy agreements and produces significant visual improvement for minimal permanent impact.
What order should I tackle small kitchen remodel ideas?
The most logical sequence for small kitchen remodel interventions addresses structural and permanent elements first, surface treatments second, and organizational and styling elements last. Begin with any changes that affect the kitchen’s structure or permanent services — ceiling-height cabinet extensions, recessed niche shelving, electrical work for lighting upgrades. Then address surface treatments — floor, backsplash tile, cabinet painting — in the order that makes practical sense (floor before painting, tile before floor to avoid floor damage during tiling). Lighting upgrades follow surface completion. Finally, address organizational systems, hardware, and styling elements — these should be the last interventions because their full effect is only visible against completed permanent surfaces.
How do I choose a color palette for a small kitchen remodel?
The most reliable small kitchen color palette formula uses a light background tone (warm white, pale greige, or soft sage at 20–30% saturation for walls and upper cabinets), a medium natural material for the primary surface (natural oak, butcher block, or light stone for counter or floor), and one bold accent applied to a single surface only (the backsplash tile, the island, or the lower cabinet bank). This three-element formula works because the light background maximizes natural light reflection, the natural material provides organic warmth that prevents the light background from reading as clinical, and the single bold accent gives the kitchen a design identity without creating the visual complexity that makes small spaces feel smaller. Avoid applying bold colors to more than one surface in a small kitchen — the effect multiplies rather than coordinates and produces a visually enclosed feeling.
Ready to Refresh Your Small Kitchen?
These 14 ideas span the full range of small kitchen remodel possibility — from the dramatic surface transformation of cabinet painting and backsplash tile, through the spatial intelligence of floor-to-ceiling pantries and ceiling-height cabinets, to the functional refinement of wall tool rails and inside-door organization, the atmospheric improvement of under-cabinet and pendant lighting, and the visual unification of cohesive container systems and herringbone floors — covering every budget, every skill level, every rental and ownership situation, and every combination of visual and functional improvement that a small kitchen can receive. Begin with the friction audit — one week of noting every moment the kitchen makes cooking harder or less pleasant than it should be — because that list is the design brief that every idea in this article exists to address. Today’s specific action: identify the single surface or storage failure that most consistently frustrates you in your small kitchen right now, and choose the one idea from this list that most directly resolves it — because the kitchen improvement that eliminates a daily frustration will be appreciated every day, while the improvement that merely adds visual beauty without solving a functional problem will be noticed only when guests visit. When your small kitchen finally has the counter space you need, the light quality that makes evening cooking feel pleasurable, and the visual coherence that makes the whole space feel designed rather than assembled — you will understand exactly why small kitchen remodeling earns its passionate, devoted community and the permanent place it holds at the top of every home improvement Pinterest board. Save your favorites now, especially the open shelving installation and the under-cabinet LED lighting — they are the two ideas that, once realized in your own kitchen, make cooking in it feel fundamentally different from the day before.